WordPress Toolkit is a management interface that allows you to install, configure, and manage WordPress in Plesk easily. In this article, we’ll show you how to manage and install WordPress themes in Plesk. Start out by accessing your Plesk control panel through your HostPapa Dashboard.
Please note that WordPress Toolkit can install, configure, and manage WordPress version 4.9 and later, and the extension is free with the Web Pro and Web Host Plesk editions. It’s available for a fee for the Web Admin edition.
How to manage and install themes
A WordPress theme determines the design of your website, including colours, fonts, and layout. By selecting a different theme, you change the look and feel of your website without changing its content.
In WordPress Toolkit, you can install themes on one or all of your WordPress installations. You can:
- Search for and install themes in the WordPress themes repository
- Install themes uploaded by the Plesk administrator
- Upload custom themes (useful if you can’t find a suitable theme in the repository or if you need to install your theme)
To install themes on a particular WordPress installation, follow these steps:
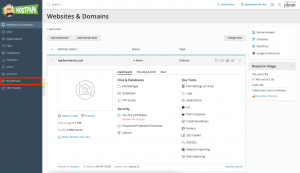
1. Go to WordPress.
2. Go to the Themes tab of an installation card.
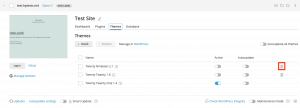
3. Click Install.
4. Search for themes, then click Install next to the theme you want to install. A newly installed theme will not automatically activate by default.
To install themes on all WordPress installations of the subscription, follow these steps:
1. Select the desired subscription.
2. Go to WordPress.
3. Go to the Themes tab.
4. Click Install.
5. Search for themes.
6. Select the themes you want to install.
7. Click Select Websites.
8. Select the websites you want to install the theme on.
9. Click Install.
To install themes uploaded by the Plesk administrator, follow these steps:
1. Go to WordPress.
2. Go to the Themes tab.
3. Click Install next to a theme marked with the download icon. If there are no themes with this icon, the administrator hasn’t uploaded any themes.
4. Installed themes uploaded by the Plesk administrator will be activated immediately by default. To prevent this, clear the Activate after installation checkbox.
5. Click Install.
To upload a theme, follow these steps:
1. Select the desired subscription.
2. Go to WordPress.
3. Go to the Themes tab.
4. Click Browse… and browse to the location of the ZIP file with the theme you want to upload.
5. Select the WordPress installations where you want to install the theme.
6. By default, a newly uploaded theme will not be activated. To activate it, select the Activate after installation checkbox.
7. Click Install.
To install an uploaded theme, follow these steps:
1. Go to WordPress.
2. Go to the Themes tab.
3. Click Install next to a theme you’ve uploaded.
4. Select the WordPress installations where you want to install the theme.
5. By default, an uploaded theme will be automatically activated. To prevent this, clear the Activate after installation checkbox.
6. Click Install.
How to activate a theme
You can activate a theme installed on a particular installation or all installations of your subscription. A WordPress installation can only have one active theme installed at a time.
To activate a theme for a particular installation, follow these steps:
1. Go to WordPress.
2. Go to the Themes tab.
3. Under State, turn on a theme to activate it. The theme that was previously active will be deactivated automatically.
To activate a theme for all installations of the subscription, follow these steps:
1. Go to WordPress.
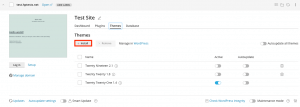
2. Go to the Themes tab.
3. Click Activate next to the theme you want to activate.
How to update themes
If a theme needs to be updated, you’ll see an Updates notice next to the theme when you’re on the Themes tab of an installation card. You can update free themes and paid themes that can be updated the usual way through the WordPress admin dashboard.
Note: WordPress Toolkit can update paid themes that need a license as long as the license is present. WordPress Toolkit can’t update paid themes that use non-standard update methods.
You can do the following:
- Update themes for a particular installation
- Update themes for multiple installations
- Configure auto-updates for themes
To update themes on multiple installations, follow these steps:
1. Go to WordPress.
2. Go to the Themes tab.
3. Click Update to version … next to the theme you want to update.
4. To learn more about the update, click Changelog to be taken to the theme’s page on wordpress.org.
5. Click Yes.
How to remove themes
You can remove themes from a particular installation or all installations in a subscription.
Note: You can’t remove an active theme. Before removing an active theme, activate another one first.
To remove themes from a particular installation, follow these steps:
1. Go to WordPress.
2. Go to the Themes tab.
3. Click the trash icon next to the theme you want to remove.
4. To remove more than one theme, select them and click Remove.
5. Click Yes.
To remove themes from all installations of the subscription, follow these steps:
1. Go to WordPress.
2. Go to the Themes tab.
3. Select the themes you want to remove.
4. Click Uninstall.
5. Click Yes.
If you need help with Plesk, please open a support ticket from your dashboard.
