Note: This article refers to the legacy version of the Website Builder. If you signed up to the HostPapa Website Builder after March 11 2020, you’re on the new version of the Website Builder. For help, go here.
In this article, we’ll show you how to edit and remove the Password Protection page from your HostPapa Website Builder.
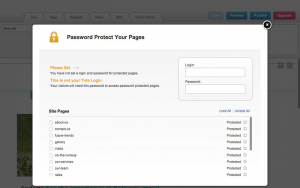
To edit the login ID and password, you assigned to your website:
- Click on Site > Site Properties.
- Click on the Password Protection option.
- A dialogue box will open up, and you will be able to see the login ID and password you assigned to your site. You can also change it if you wish.
- You can easily protect all your pages by clicking on Lock All or take off the password protection by clicking on Unlock All.
- Close the window to save your changes.
If you make any changes to the login ID and password, remember to publish your site to make this change effective on the live version of your site.
Follow these steps to take password protection off a specific page:
- Go to the Site > Site Properties.
- Click on Password Protection.
- A dialogue box will open. Click on the box of the page you want to remove password protection from. If you have locked all of your pages, click Unlock All to unlock them.
- Close the window to save your changes.
- Click on Preview or, to make the changes live immediately, republish your site.
If you need help with your HostPapa account, please open a support ticket from your dashboard.
